Removing a kitchen faucet with a U-shaped bracket can seem daunting, but it’s really not that difficult. In this guide, we will walk you through the process step by step. We’ll provide tips on how to avoid common problems and help you get the job done quickly and efficiently. So whether you’re replacing your kitchen faucet or just giving it a good cleaning, follow these steps and you’ll be up and running in no time!
When Would You Want to Replace a Kitchen Faucet?
There are a few reasons you might want to replace your kitchen faucet. Maybe the older model faucet is outdated and may not have the features that you want. You may also want a different style of faucet to match the look of your newly renovated kitchen. However there are factors that indicate you should consider a replacement.
It became scratched and damaged over time
If your kitchen faucet is starting to show its age, you may want to replace it with a newer model. As time goes on, every object in your home will start to show wear and tear. This is especially true for items that see a lot of use, like your kitchen sink.
Over time, the finish on your faucet can become scratched or chipped. The moving parts can also become worn down, making it difficult to operate the faucet.
It’s starting to leak
If your faucet is leaking, then it’s definitely time for a replacement. A leaking faucet can waste a lot of water, which will end up costing you money on your water bill. In addition, a dripping faucet can cause water damage to your countertop or sink. If you ignore the problem, it will only get worse.
It’s not working properly
If your faucet is not working properly, it may be time for some inspection and repairs. However, depending on the severity of the problem, it may be easier and more cost-effective to just replace the entire faucet. If your faucet is difficult to operate or the water pressure is low, then it’s probably time for a new one.
Still, even if you don’t plan on replacing the entire faucet, it’s important to know how to disassemble it properly. This way, if you ever need to make repairs or replace some of the parts, you’ll be able to do so easily. So let’s get started!
If you’re thinking about replacing your kitchen faucet, here are a few things to keep in mind:
- You’ll need to know what type of faucet you have so you can buy the correct replacement;
- Have a bucket handy to catch any water that may drip out when you’re removing the faucet;
- Pay attention to how everything is put together so you can easily reassemble it later;
- Always wear protection for your hands and eyes when working underneath the sink;
- Types of Kitchen Faucet Brackets
Before you start taking your faucet apart, you need to know what type of bracket it has. Mounting brackets are the pieces of hardware that connect your faucet to the sink. They come in all shapes and sizes and because of that, the process of removing a faucet can vary slightly depending on the type of bracket you have.
Since we are going to talk about dealing with faucets that have U-Shaped brackets, let’s see how to identify them. U-Shaped brackets are easy to spot because they look like a “U” shape when viewed from the top. The faucet is always attached to this bracket with screws. [1],[2]
Should You Remove the Faucet by Yourself or Seek Professional Help?
In some cases, it may be best to hire a professional plumber to remove and install your new faucet.
One thing you should consider before calling a plumber, is the cost. Hiring a professional can be expensive, so it’s important to weigh the cost of their services against the cost of the faucet itself.
In addition, not all plumbers will be able to get to work right away. So, you may need to wait a few days or even weeks before they can come to your home. If you’re in a rush to get the job done, then you may be better off doing it yourself.
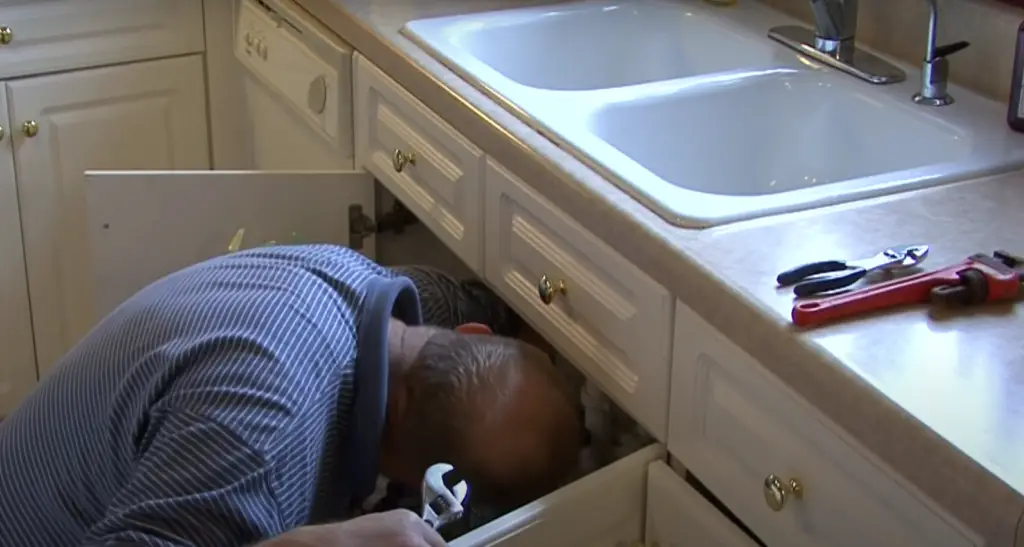
Just keep in mind that removing a kitchen faucet is not as easy as it sounds. There are a lot of small parts involved and if you’re not careful, you could end up damaging something. In addition, you are going to spend a long time crouched over your sink, so it’s not the most comfortable job in the world. For this reason you must have enough patience and be very careful when removing your faucet.
In some cases, you may require some special tools to remove your specific kitchen faucet model. If you don’t have these tools, then you may need to purchase them beforehand. This can add to the cost of the project and it’s something you need to take into consideration before starting. [1]
Assuming you have decided to take on the task by yourself, let’s move on to the next section where we’ll show you how to remove a kitchen faucet with a U-Shaped bracket.
Removing a Kitchen Faucet with a U Bracket
Shut off the water supply
The first thing you need to do is turn off the water to your sink. You can do this by shutting off the valves under your sink. If the shutoff valves aren’t working or if you can’t find them, then you’ll need to turn off the main water supply to your home. Once the water is shut off, open up your faucet to release any residual water that may be in the lines. Now would also be a good time to place a bucket under your sink to catch any drips.
Waterproof gloves will help keep your hands dry and safe from any sharp edges. You should also wear safety glasses to protect your eyes from water and flying debris. [1],[3]
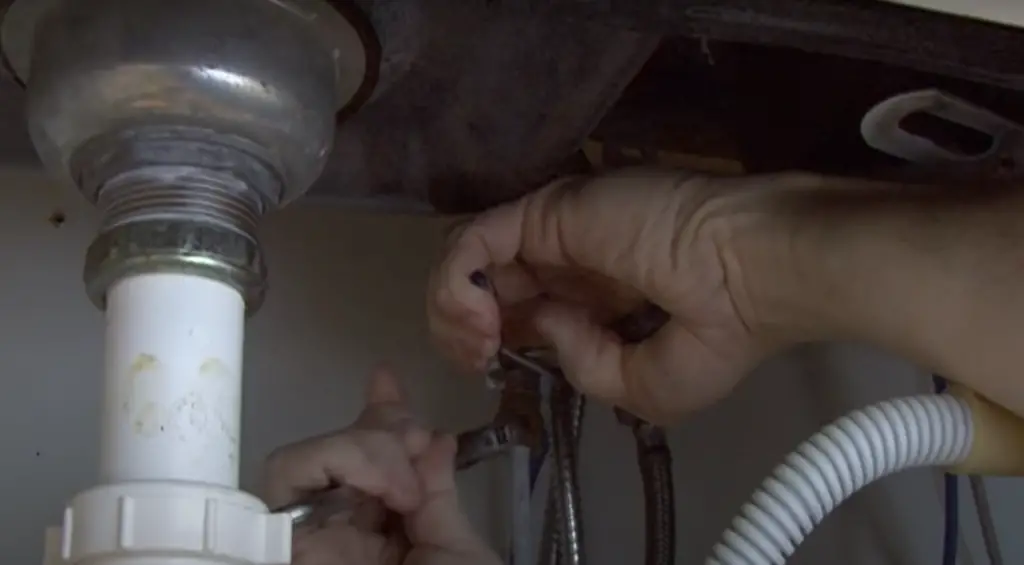
Loosen the nuts that hold hot and cold water lines
The next step is to loosen the coupling nuts that hold the hot and cold water lines in place. Depending on the type of your faucet mounting, their location may differ. You will need to use an adjustable wrench or a pair of pliers to loosen them. Be careful not to damage the supply lines.

You may find it helpful to spray some penetrating oil on the coupling nuts before attempting to remove them. This will help break up any rust or corrosion that may have built up over time and make the removal smoother.
Remove the water lines
Once the coupling nuts are loose, you can remove the water lines from the faucet by slowly guiding the lines out of their seats. Again, be careful to not damage the lines.
Disconnect sprayer hose, if your kitchen faucet has one
Locate the retaining clip that holds the sprayer hose in place. The location of this clip will vary depending on the model of your faucet. Once you’ve found it, use a pair of pliers to remove the clip. Now you can pull the sprayer hose out from its seat and disconnect it from your faucet. [1],[3],[4]
Now that the water lines have been removed, you should be able to see the bolt that holds the faucet in place underneath it.
Remove the nut that holds the bracket in place
The U-shaped bracket is held in place by a large nut.
The location of the nut will differ depending on the model of your faucet, but usually it’s located underneath the sink. Some models may even come with two bolts that secure them.Sometimes the bolt may be hidden behind the quick-connect clips. In this case, you will need to remove the clips before you can access the bolt. These clips are fairly easy to remove as you only need to squeeze the buttons on their sides.
Use an adjustable wrench or a pair of pliers to loosen and remove the retaining nut. Once the nut has been removed, you should be able to pull the U-shaped bracket out from its seat. Squeeze the bracket together and pull it down strong enough. You may wiggle it a little for easier removal.
Lift the faucet out of the sink
With the U-shaped bracket removed, you should be able to lift the faucet out of the sink. Be careful not to damage your sink as you’re removing the faucet. Sometimes the faucet will fall out on its own, so be prepared to catch it. [1]

Once the old faucet has been removed, you can proceed to install a new one. Be sure to follow all instructions that come with your new faucet carefully. If you’re not sure how to install your new faucet, you can always hire a professional to do it for you.
Removing a Kitchen Faucet with a U-Shaped Bracket: Step-by-Step Guide
When it’s time to replace your kitchen faucet or make repairs, removing it can be a straightforward process, especially if it’s secured with a U-shaped bracket. Below, we provide a step-by-step guide on how to remove a kitchen faucet with a U-shaped bracket, including the tools you’ll need and important considerations to ensure a successful and hassle-free removal.
| Step | Instructions |
|---|---|
| 1. Gather Tools | Collect the necessary tools, including an adjustable wrench, pliers, a screwdriver, and a bucket or towels to catch any water. |
| 2. Turn Off Water Supply | Locate the shut-off valves under the sink and turn them clockwise to shut off the hot and cold water supply to the faucet. |
| 3. Disconnect Supply Lines | Use the adjustable wrench to disconnect the hot and cold water supply lines from the faucet. Place a bucket or towels underneath to catch any residual water. |
| 4. Remove Faucet Nut | Locate the U-shaped bracket securing the faucet to the sink. Use pliers or a wrench to loosen and remove the nut holding the bracket in place. |
| 5. Disconnect Sprayer Hose (If Applicable) | If your faucet has a sprayer, disconnect the sprayer hose from the faucet body. Use pliers if needed. |
| 6. Lift Faucet | Gently lift the faucet and associated components (such as the sprayer) out of the sink. If the faucet is stuck, you may need to wiggle it slightly or apply some penetrating oil to loosen it. |
| 7. Clean the Area | Before installing a new faucet, clean the area around the sink to remove any old sealant or debris. |
| 8. Seal the Sink | If you’re not immediately installing a new faucet, seal the sink holes with a temporary plug or sealant to prevent water from getting into the cabinet below. |
Explanation of the Table:
- Gather Tools: Lists the tools needed for the removal process.
- Turn Off Water Supply: Explains how to shut off the water supply to the faucet.
- Disconnect Supply Lines: Describes how to disconnect the water supply lines.
- Remove Faucet Nut: Details the process of removing the U-shaped bracket’s nut.
- Disconnect Sprayer Hose: Provides instructions for disconnecting the sprayer hose, if applicable.
- Lift Faucet: Explains how to lift the faucet from the sink.
- Clean the Area: Advises on cleaning the sink area for a new installation.
- Seal the Sink: Suggests sealing the sink holes if a new faucet isn’t immediately installed.
By following these step-by-step instructions, you can successfully remove a kitchen faucet with a U-shaped bracket and prepare for the installation of a new faucet or any necessary repairs.
FAQ
How do you remove a stubborn kitchen faucet?
If your kitchen faucet is stubborn and won’t come loose, there are a few things you can try. First, make sure you have the right tools. You’ll need a basin wrench and an adjustable wrench. If you don’t have a basin wrench, you can use a pair of pliers.
Once you have the right tools, loosen the screw that holds the U-shaped bracket in place. The screws are usually located under the sink. Once the screws are loosened, you should be able to remove the U-shaped bracket easily.
If your kitchen faucet still won’t budge, try applying some lubricant to the area where the U-shaped bracket meets the faucet. This should help loosen the faucet so you can remove it easily.
Can you remove a kitchen faucet by yourself?
If you’re comfortable working under your sink and have a basic understanding of how plumbing works, then yes, you can remove a kitchen faucet by yourself. Just be sure to have the right tools on hand and take your time so you don’t damage any pipes.
How do you remove faucet clips?
There are two ways to remove faucet clips. The first is by using a screwdriver to pry the clips off of the bracket. The second is by using a pair of pliers to pull the clips off of the bracket. Either way, you should be careful not to damage the finish on your sink. Once the clips are removed, you will be able to slide the faucet off of the bracket.
Is it necessary to turn off the water supply before removing a kitchen faucet with a U-shaped bracket?
Yes, it’s crucial to turn off the water supply before attempting to remove a kitchen faucet. Locate the shutoff valves under the sink or turn off the main water supply to your home. This prevents water from flowing when you disconnect the faucet, avoiding potential flooding or water damage.
What tools are typically needed to remove a kitchen faucet with a U-shaped bracket?
To remove a kitchen faucet with a U-shaped bracket, you may need the following tools:
1. Adjustable Wrench: Used to disconnect water supply lines and loosen nuts or bolts securing the bracket.
2. Pliers: Helpful for gripping and turning nuts or bolts.
3. Screwdriver: Depending on your faucet design, a screwdriver may be needed to remove handles or other components.
4. Bucket or Towel: Placing a bucket or towel under the faucet helps catch any water that may drip during the removal process.
5. Putty Knife: Useful for gently prying a stubborn faucet if it’s stuck due to old sealant or adhesive.
Are there any precautions to take when removing a kitchen faucet with a U-shaped bracket?
Yes, there are precautions to consider:
1. Turn Off Water: Always turn off the water supply before starting the removal process to avoid leaks or flooding.
2. Disconnect Power: If your faucet has an electrical component, like a touchless sensor, ensure the power source is disconnected to prevent electrical hazards.
3. Gather Tools: Gather all the necessary tools and materials before starting to make the process smoother.
4. Protect the Countertop: Place a towel or cloth on the countertop to protect it from scratches or damage during faucet removal.
5. Have a Backup Plan: In case of unexpected difficulties, have a backup plan or consider seeking professional assistance to avoid damaging the faucet or plumbing.
What should I do if the U-shaped bracket is difficult to loosen during faucet removal?
If the U-shaped bracket is challenging to loosen, consider using penetrating oil on the nuts or bolts to help loosen them. Additionally, ensure you are using the correct-sized wrench or pliers and apply steady, controlled pressure to avoid damaging the fasteners or bracket. If the bracket remains stubborn, it’s advisable to consult a professional plumber for assistance.
Useful Video: Removing kitchen faucet with a U shaped brace under the sink
Conclusion
So, you thought about replacing a kitchen faucet. You removed the water lines, disconnected the hose and noticed a strangely shaped U bracket confused about how to remove it. In this article we have covered the entire removal process, and from it we can conclude that removing a kitchen faucet with the U bracket is actually not as confusing as it seems. Once you get access to the bracket, just unscrew the nut that holds it in place underneath the sink. After that, you can easily pull the bracket out and remove the faucet. We hope you found this tutorial helpful. Thanks for reading!
References:
- https://www.sonyaburgess.com/removing-a-kitchen-faucet-with-u-bracket/
- https://bathever.com/remove-kitchen-faucet-with-u-shaped-bracket/
- https://www.thespruce.com/removing-a-faucet-2718826
- https://www.thespruce.com/installing-a-kitchen-sink-sprayer-2718817