
Removing a Delta kitchen faucet is not as difficult as it may seem. With the right tools and knowledge, you can easily remove your existing faucet in no time at all. This guide will walk you through the steps of removing a Delta kitchen faucet so that you can replace it with a new one or simply clean up around it. You’ll need to have some basic plumbing supplies on hand such as an adjustable wrench, plumber’s putty, and pipe thread sealant tape. Once you have these items ready, follow these simple steps for successful removal of your Delta kitchen faucet.
What Tools You Will Need
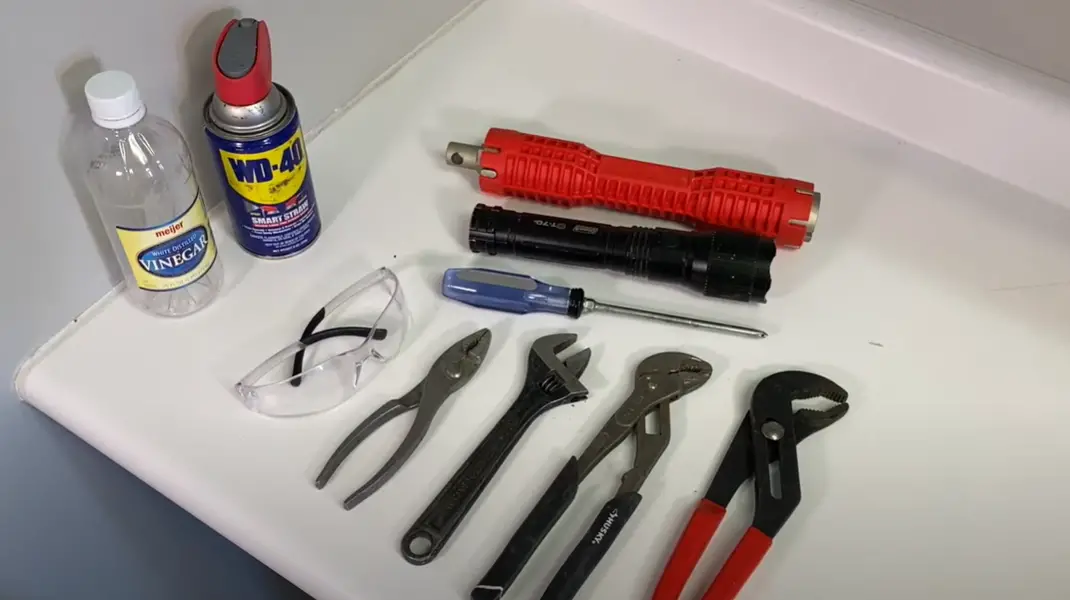
- A Phillips Head Screwdriver
- An adjustable wrench
- Plumber’s Putty
- Pipe thread sealant tape [1]
Instructions On How To Remove The Delta Kitchen Faucet
Now, let’s delve into the procedure for removing a Delta kitchen faucet.
Cut Off The Water Supply
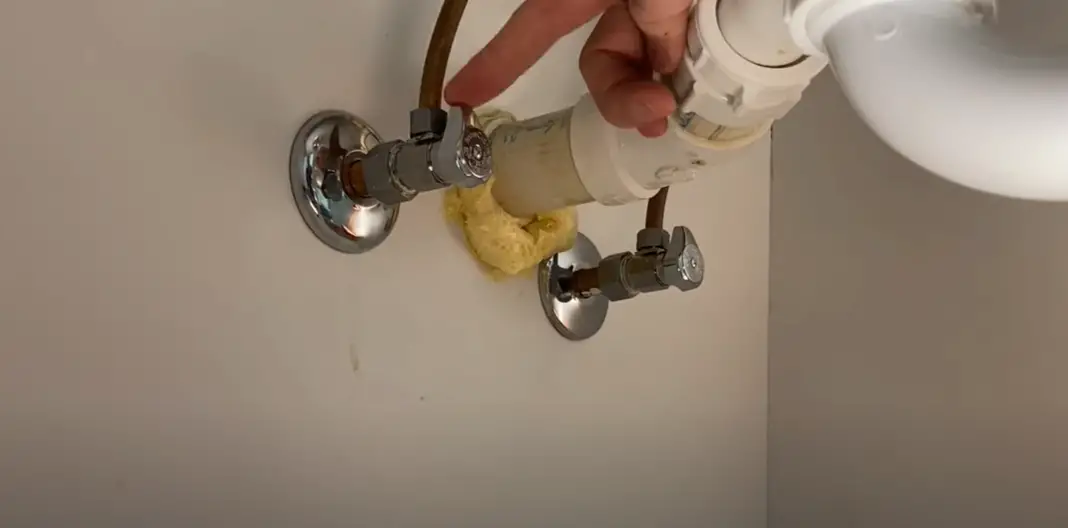
To begin the process of taking off a Delta kitchen faucet, start by shutting down the water supply. This can usually be done by turning two valves on the cold and hot water pipes that lead into the faucet. It’s best practice to turn both of these simultaneously as that cuts off the flow of water faster and more effectively.
Remove Hoses From The Faucet
To start the process of uninstalling your Delta kitchen faucet, you must first find the flexible hoses linking it to the shut-off valves. If your faucet has side-mounted levers, you should be able to find the hoses behind them. Once you have located the hoses, unscrew them by hand and then pull them away from the faucet. Make sure to have a bucket on hand to catch any dripping water.
Take Off The Retaining Plate Or Nuts
The first step to removing a Delta kitchen faucet is to take off the retaining plate or nuts. This is usually located underneath the sink and provides some extra security for the faucet assembly. You’ll need a screwdriver, adjustable wrench, and/or pliers depending on what type of hardware your faucet has. Once the hardware is off, you can carefully pull the faucet assembly out from underneath the sink.
Extract The Faucet
- Turn off the water to your sink by turning off the shut-off valves underneath it. Clamp a towel around the base of the faucet where it meets the sink to prevent any debris from falling in while you work and place a bucket underneath.
- Unscrew and remove the handles, escutcheons, and stem assemblies of the faucet. If the handles are stuck or difficult to remove, use a handle puller tool to help you out.
- Locate and unscrew the lock nuts holding the faucet in place from under the sink with an adjustable wrench.
- Pull off the entire body of your Delta kitchen faucet from the sink. Place it in the bucket or on a clean surface, away from any dirt or debris.
- Inspect the faucet for any mineral deposits that may be built up and use a scrub brush to remove them if present.
- Install your new Delta kitchen faucet by first attaching the gasket and mounting nuts onto the faucet body. Then, place it in the sink and thread the mounting nuts from underneath to hold it firmly in place and tighten with an adjustable wrench. Attach the handles, escutcheons, and stem assemblies securely.
- Turn on the water valves beneath your sink to restore water flow to your kitchen faucet. Test the faucet to make sure it is functioning properly. If it isn’t, double-check that each part has been securely tightened in place. [2]
Other Helpful Tips
- If the faucet has been in place for a long time, it may be stuck. Gently tap around the edges of the faucet base with a rubber mallet and/or use an adjustable wrench to loosen the nuts and bolts securing it.
- Before you begin, turn off both your hot and cold water shut-off valves located under the sink.
- Once the faucet has been successfully removed, take it apart to inspect for any blockages or damage that may need to be repaired before reinstalling.
- Inspect all components for signs of corrosion and replace any worn out pieces if necessary.
- To ensure a proper seal, use plumber’s putty or a high-grade silicone caulk on any exposed surfaces of the new faucet.
- When reinstalling the new faucet, make sure to torque each nut and bolt correctly with an adjustable wrench.
How To Remove a Delta Touch Kitchen Faucet?
Removing a Delta touch kitchen faucet can be done in a few simple steps. Here’s what you’ll need: adjustable pliers, basin wrench, and a flathead screwdriver.
- Shut off the water supply by turning off the shutoff valves located underneath the sink or behind it.
- After the water has been shut off, use adjustable pliers to unscrew the upper faucet handle.
- Locate and remove the nut to free up the spout by using a basin wrench.
- Pull out the faucet from its place in the sink and disconnect it from the PEX pipe or supply tube using a flathead screwdriver.
- Once the faucet is removed, adjust any plumbing as needed to fit your new Delta touch kitchen faucet in place.
- Finally, turn the water back on and test the new Delta touch kitchen faucet before putting everything back together again!
How To Remove a Delta Kitchen Faucet Head?
- Shut off the water supply to the faucet.
- Loosen the bonnet nut underneath the sink and pull it out of its place.
- Remove the handle, then unscrew and lift out the stem assembly in order to remove it from its socket beneath the sink.
- Now take a wrench to loosen the hex nut that holds the faucet head onto the spray hose.
- Once this is removed, you can take out the faucet head from its place and replace it with a new one.
- Make sure to put back all parts in their original places before turning on the water again.
- Finally, test the faucet to make sure it’s working properly and fully reassembled.
Removing Quick-Connect Fittings
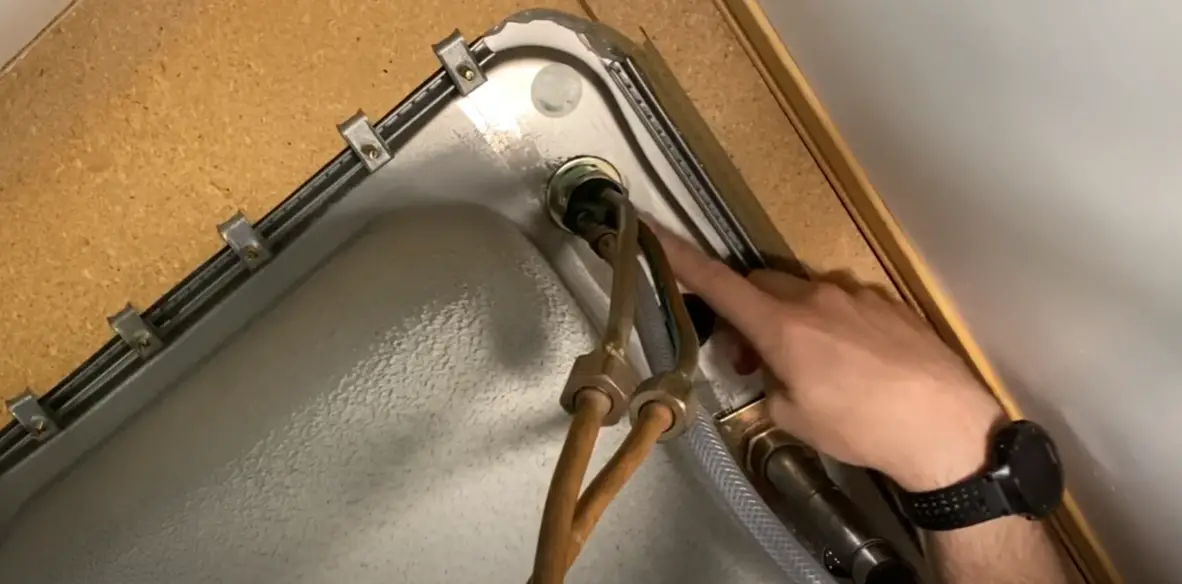
- Shut off the water main to the kitchen sink.
- Place a bucket under the Delta faucet and unscrew the sprayer hose by hand. Then, disconnect any supply lines running into your faucet.
- Unscrew the Quick Connect fitting located at the base of your faucet using a pair of pliers.
- If the faucet is attached to a sink, use an adjustable wrench to loosen the mounting nuts at the base that hold it in place.
- Remove the Delta kitchen faucet from your sink or countertop by pulling it straight up and away from the surface.
- Wipe down the sink or countertop with a damp cloth to remove any residue.
- Reconnect the supply lines and sprayer hose, then turn on the water main when finished.
- Test your faucet for any leaks before reattaching it to make sure it is securely attached and functioning properly. [3]
When Should I Call A Plumber Instead?
When it comes to removing a Delta kitchen faucet, it’s best to assess the situation and determine if you have the necessary skills and tools for the job. If you are uncomfortable or inexperienced in fixing plumbing issues, it is best to call a professional plumber. A plumber can diagnose any potential issues and ensure that everything is installed correctly and that there are no leaks. In addition, they can provide advice on how to properly maintain the faucet and make sure everything is in proper working order.
Removing a Delta Kitchen Faucet
If you need to replace or repair your Delta kitchen faucet, you’ll first need to remove the existing one. Here’s a comparison of common steps and precautions for safely removing a Delta kitchen faucet.
| Common Steps | Precautions | Tools Required |
|---|---|---|
| Turn off the water supply | Make sure to shut off both the hot and cold water supplies to the faucet to prevent any water flow. | Adjustable wrench, bucket, rags, and Teflon tape. |
| Disconnect water supply lines | Use an adjustable wrench to disconnect the water supply lines from the faucet’s hot and cold valves. | Adjustable wrench, bucket, and rags. |
| Remove mounting nuts | Use an adjustable wrench to loosen and remove the mounting nuts securing the faucet to the sink. | Adjustable wrench. |
| Lift and remove the faucet | Carefully lift the faucet from the sink, ensuring no water remains in the lines or faucet. | N/A |
Explanation of the table:
This table provides a comparison of common steps and precautions for removing a Delta kitchen faucet. It also lists the tools required for a successful removal process, which includes turning off the water supply, disconnecting water supply lines, removing mounting nuts, and safely lifting the faucet from the sink. Following these steps and precautions will help you complete the removal task effectively.
FAQ
How do you remove a Delta kitchen faucet with a U shaped bracket?
- Begin by turning off the water supply to the faucet and disconnecting the hose from the spray nozzle.
- Place a bucket under the faucet to catch any residual water in the lines.
- Loosen and remove the U shaped bracket by unscrewing the mounting nuts.
- Lift the faucet out of the sink and discard it.
- Clean off any remaining sealant or debris from the sink surface.
- To reinstall the faucet, reverse these steps. Make sure to use a quality sealant when reinstalling the faucet to prevent any water leaks.
How do you remove a Delta faucet without screws?
Removing a Delta faucet without screws requires careful and precise steps to prevent damage. It is important to be patient, take your time and use the right tools for the job. The first step is to locate the faucet handle. Depending on your model, this may be a lever or knob. Once the handle is located, you must then use an appropriate tool to loosen the base. A flat head screw driver or adjuster wrench can be used to do this. You may need to use a pair of pliers for stubborn screws. Next, locate the clips or screws that secure the faucet to the sink. This may require a pair of needle-nose pliers. Once these are removed, you can carefully pull the faucet away from the sink. If necessary, use a putty knife to break any seal between the faucet and sink. Finally, you should be able to lift the entire unit away from the sink. Be sure to pay attention to the order and orientation of any parts you remove so that you can re-install them correctly. Doing this will ensure a smooth reinstallation process. After the faucet is removed, you can now install a new Delta faucet.
What is the best tool to use when removing the cap on a Delta faucet?
When it comes to removing a Delta faucet cap, the best tool to use is an allen wrench. Before attempting to remove the cap, make sure to turn off the water supply underneath the sink. Once the water is shut off, locate the screw underneath the cap and use an allen wrench to remove it. After the screw is removed, carefully pull off the cap from the faucet’s handle.
Make sure to keep the screw and cap in a safe place until you are ready to install the new faucet.
How do you remove a stuck Delta faucet cap?
In some cases, a Delta kitchen faucet might become stuck on the sink. If this occurs, it is usually caused by corrosion and mineral deposits. To remove a stuck Delta faucet cap, you can use a variety of tools and techniques. First, make sure the water is off and the faucet is dry. Then, try using a pair of pliers or locking jaw pliers to turn the cap counterclockwise. If this does not work, you can try using a penetrating oil such as WD-40 to help loosen the cap. If this fails, you may need to use a hacksaw to carefully cut away the top of the cap. Once removed, you can use a putty knife or a razor blade to scrape away any corrosion or mineral deposits. Finally, you can apply a lubricant such as silicone grease and reinstall the Delta faucet cap.
What is the easiest way to unscrew a faucet?

The easiest way to unscrew a faucet is by using a pair of adjustable pliers to loosen the mounting nuts. Additionally, special tools like basin wrenches, strap wrenches, and faucet-removal tools can be used to loosen the mounting nuts. It is important to make sure the pliers are adjusted to fit the size of the mounting nuts before attempting to unscrew them.
What is the easiest way to remove a kitchen faucet?
Removing a kitchen faucet can be a tricky task. Fortunately, Delta has designed their faucets to make the process as easy as possible. With a few simple steps, you can have your old faucet removed and replaced in no time.
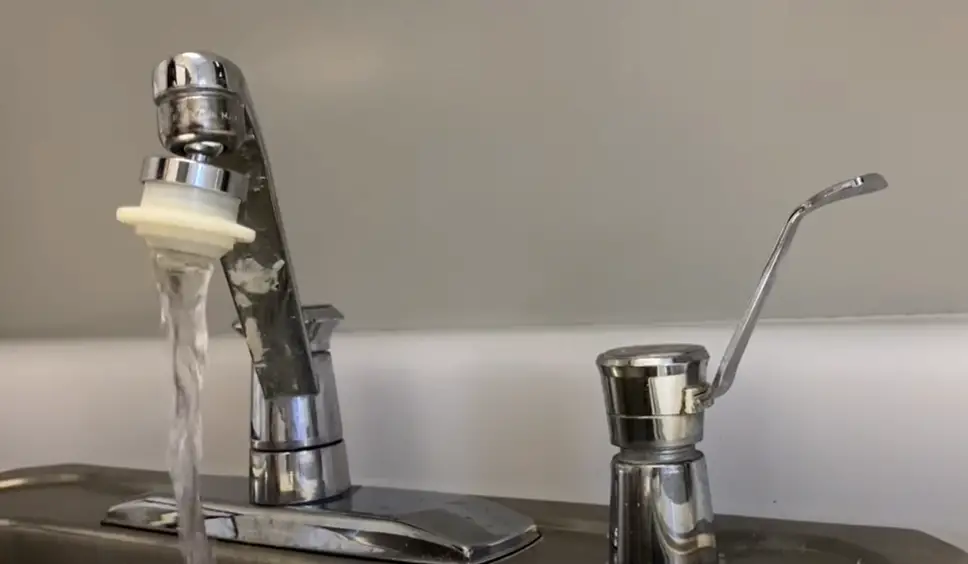
How do you remove a hidden aerator from a Delta faucet?
- To unearth a concealed aerator from your Delta faucet, it is essential that you turn off the water supply.
- Utilize an adjustable wrench to unfasten the screw that is located beneath the faucet’s handle and detach it from the faucet.
- Put a towel or cloth beneath the faucet to collect any water that might remain inside.
- Remove the bonnet that is covering the aerator by unscrewing it with an adjustable wrench.
- Unscrew the aerator from the faucet and remove it.
- Clean any debris or residue from the faucet before replacing the aerator.
- Reattach the bonnet and secure it with the adjustable wrench.
- Replace the screw underneath the handle, making sure it is tight.
- Turn the water supply back on and test that the faucet is functioning properly.
- If necessary, adjust the flow rate of the faucet by turning the aerator.
Is there a special tool to remove the kitchen faucet?
Yes, Delta recommends using an Allen wrench or hex key to remove the faucet. To do this, first locate the setscrews on the faucet. The location of the setscrews will vary depending on the model of your Delta faucet, but they are usually located under the faucet handle. Once you have located the setscrews, use an Allen wrench or hex key to loosen them. Next, use a basin wrench to reach down behind the sink and loosen the nuts that are holding the faucet in place. Once the nuts are loose, you should be able to pull the faucet out from underneath the sink. Ultimately, ensure no water is seeping out before detaching the faucet altogether. To achieve this, simply close the shut-off valves beneath your sink or promptly turn off the primary water supply to your home.
Which tool is used to detach a faucet?
To safely dismantle a Delta kitchen faucet, you require some tools such as an adjustable wrench and flat-head screwdriver. The adjustable wrench is used to detach the supply lines from the valves, while the flat-head screwdriver can be used to remove any mounting screws that may be holding the faucet in place. Once all of the supply lines have been detached and mounting screws removed, you can proceed to unscrew the faucet from its mounting base.
How do you unscrew a nut under a faucet?
The nut under a faucet is usually used to hold the faucet securely in place. It can be difficult to remove, as it often requires a wrench or an adjustable spanner. Before attempting to unscrew the nut, be sure to turn off the water flowing through the faucet. Place a towel or rag under the faucet to catch any water that may leak out. Using a wrench or adjustable spanner, loosen the nut by turning it counter-clockwise. Be careful as the nut may be corroded and could break easily. Once it has been loosened, you should be able to unscrew it by hand. After the nut has been completely removed, you can replace it with a new one if necessary.
What are the essential steps to safely remove a Delta kitchen faucet?
To safely remove a Delta kitchen faucet, follow these essential steps:
1. Turn off the water supply to the faucet.
2. Remove the faucet handle to access the cartridge or valve.
3. Disconnect the water supply lines from the faucet.
4. Use a wrench or pliers to unscrew and remove the mounting nut securing the faucet.
5. Lift the faucet off the sink or countertop, ensuring all connections are detached.
How can I access and remove the cartridge or valve in a Delta kitchen faucet during the removal process?
To access and remove the cartridge or valve in a Delta kitchen faucet, first, remove the faucet handle, which may involve removing a screw or cover cap. Once the handle is off, you can access the cartridge or valve and proceed with removal.
What tools and equipment do I need to efficiently remove a Delta kitchen faucet?
You will need some basic tools and equipment to remove a Delta kitchen faucet, including an adjustable wrench, pliers, and a screwdriver. Additionally, you may require a basin wrench if you need to access hard-to-reach areas under the sink.
Are there specific precautions to take to prevent damage or leaks when removing a Delta kitchen faucet?
To prevent damage or leaks when removing a Delta kitchen faucet, turn off the water supply, have a container or towels ready to catch any residual water, and take care not to damage any surrounding components or surfaces. Following the manufacturer’s instructions is also essential to prevent issues.
What should I do if I encounter stubborn or hard-to-remove parts while attempting to remove my Delta kitchen faucet?
If you encounter stubborn or hard-to-remove parts during the removal process, consider applying penetrating oil to loosen stuck connections. Use gentle, controlled force, and if necessary, seek professional assistance if you’re unable to remove the faucet on your own.
Useful Video: How To Install A New Delta Kitchen Faucet (Including Removal)
Conclusion
Removing a Delta kitchen faucet is a fairly straightforward process that anyone can do, as long as they have the right tools. Before beginning the process, it’s important to turn off the water supply and unplug any electrical connections. Once this is done, you can remove the handle, unscrew the mounting nut and pull out the faucet. Once you have access to the valves, you can disconnect the supply lines and remove the faucet from the sink. Before reinstalling a new Delta kitchen faucet, make sure to check for any leaks or other issues that could disrupt the normal flow of water.
References
- https://www.waterheaterhub.com/how-to-remove-a-delta-kitchen-faucet/
- https://plumbinghours.com/how-to-remove-a-delta-kitchen-faucet/
- https://www.scratchkitchensalem.com/how-to-remove-a-delta-kitchen-faucet/
- https://www.mrkitchenfaucets.com/how-to-remove-a-delta-kitchen-faucet/